
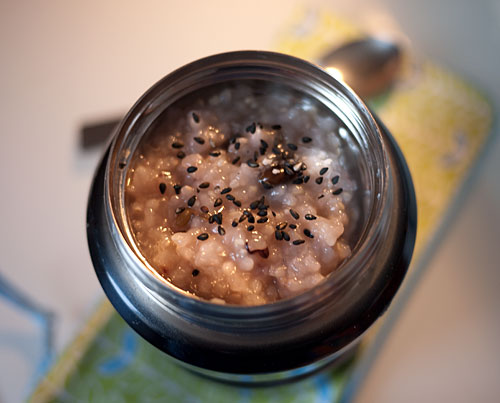
Brown rice porridge with azuki beans (azuki iri genmai gayu)
Kayu (or okayu to use the honorific term) is a simple rice porridge, made from rice, water and a few other ingredients. When Japanese people feel sick, or they feel they've overeaten, they often turn to a bowl of kayu. It's the answer to overfeasting, overdrinking, and general over-indulging. Kayu is related to congee and jook (or juk in Korean) - and loosely related to rice pudding and even risotto. All rice based food cultures have some kind of rice porridge.
Kayu is also really well suited to thermal bento jars. I did a little experiment, comparing kayu that had been kept warm in a lunch jar for about 4 hours, vs. some cooled kayu that I put in a bowl and heated up in the microwave. While the microwaved kayu was scorchingly hot, it had turned a bit gluey while it was cold. The kayu in the lunch jar was quite warm without being mouth-burningly hot, and had retained the smooth, soothing texture of just-cooked kayu better. (Although a bit of added water did fix the glueiness of the microwaved kayu.)
This kayu is made with brown rice with the addition of azuki beans. It's a classic combination and a standby of Buddhist monks and other traditional vegans, because it's packed with nutrition and fiber. The only thing I add to it is some gomashio or sesame salt, carried in a little parchment paper packet. It's the perfect minimalist, one-pot, one-container lunch, that will help your body recover from the holidays. It's vegan and gluten-free and everything too! An added bonus: even when you fill a 16-oz lunch jar like the one I'm used here with this kayu, it's only about 300 calories, give or take a few calories depending on the amount of gomashio or other stuff you add.
It does take some time to cook, so make it ahead of time and keep a pot in the fridge, or freeze it in portion-sized units. It'll keep for a few days in the refrigerator, and a month in the freezer.
Recipe: Brown rice porridge with azuki beans (小豆入り玄米粥 - azuki iri genmai gayu)
This will make about 6 cups of fairly thick kayu. To make it thinner, add more water. You don't have to stick to the exact amounts I've listed here - just stick to the ratio of rice to water. I have used a 1:5 ratio, i.e. 1 cup of rice to 5 cups of water. I often make it at a 1:7 ratio too. At 1:10 or so it starts to become less of a porridge and more of a soup. I don't recommend cooking more than 2 cups' worth of rice at a time, especially brown rice, since when it turns into kayu it will expand more than you ever imagined possible.
- 1 cup (240ml) brown rice, rinsed
- 3 tablespoons dry azuki beans
- a pinch of salt
- 5 cups (5x the amount of rice) water - try 7 cups for a looser porridge
Regular pot method
Put everything into a heavy-bottomed pot that has plenty of room for the rice to expand in, and let soak for a few hours or overnight. Bring up to a boil over high heat until the water is boiling, then reduce the heat right down. Put on a lid, with a chopstick or spoon or something stuck in between the lid and the pot rim to keep the lid slightly open (this prevents the rice from boiling over). Cook, stirring occasionally, for about an hour.
Rice cooker method
Some rice cookers have a 'porridge' function. Use that according to the cooker's instructions.
If you just have a regular straightforward rice cooker, put the ingredients in the pot and let soak as for the regular pot method. Switch the rice cooker on and cook. When the switch goes up, test the porridge - if it's soft enough, you are done, otherwise switch the cooker on again and repeat. Repeat again if needed until the porridge is as runny and soft as you want it to be.
Pressure cooker method
This is the method I use since it takes so little time. Put the ingredients in your pressure cooker - there's no need to soak the rice. Lock on the lid and bring the cooker up to pressure. Reduce the heat to low, and cook for 30 minutes. You're done!
Slow cooker method
I don't own a slow cooker, but I have read that congees and other rice porridges can be cooked successfully in one. Try putting all the ingredients in your cooker and leaving it to cook. It may take a while.
Toppings
I've used some gomashio (sesame salt) here, which really works well and adds to the kayu's nutritional value. You can use any furkake of your choice instead, either store bought or homemade. Adding an umeboshi plum to kayu is classic too. I haven't tried it yet, but I think that negimiso (miso-onion paste) would work well too. Regardless of what topping you choose, I recommend carrying it along separately and mixing it into your kayu at the last minute, instead of mixing it in in advance.
Making in advance and re-heating
For bento use, it's most practical to make the kayu in advance. To reheat in a pan, just add a little water and stir until hot. If you're reheating in a microwave, put the kayu in a bowl and add a bit of water. Microwave on the high setting for a minute, give it a good stir, then microwave again for 30 seconds to a minute until it's piping hot. If you have frozen your kayu, defrost the rice enough so that you can stir it around before adding water. Pack your hot kayu immediately into your pre-heated thermal bento jar. (Pre-heat your jar by filling it with boiling water and leaving for a minute.)
If you enjoyed this article, please consider supporting this site by becoming my patron via Patreon.